An Azure Project for automating the process of setting up a user and resources for new employees via mails.
This is inspired by @madebygps list for AZ104, but I implemented it without using Logic app for whole functionality instead utilizing Automation Account due to incompatiblity I faced with Entra ID Connector.
Services/Tools Used
- Azure Logic App
- Azure Automation Accounts
- Azure Entra ID
- Azure Resource Manager
- Az Powershell Module
- Outlook
1.1 Some Pre-requisites
- Make an resource group named 'users' where all employee resources will be deployed.
- The code mentioned and related to this project is located in this GitHub repository.
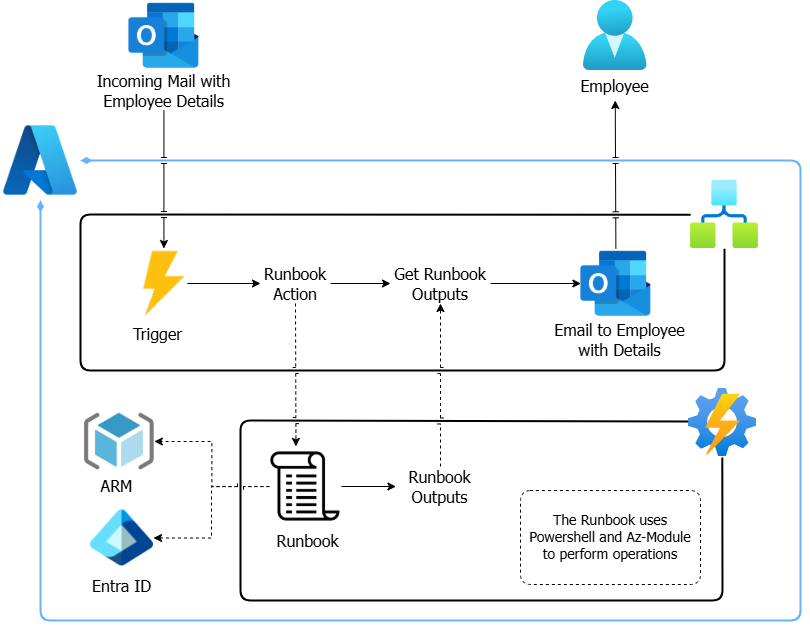
1.2 Logic App Workflow
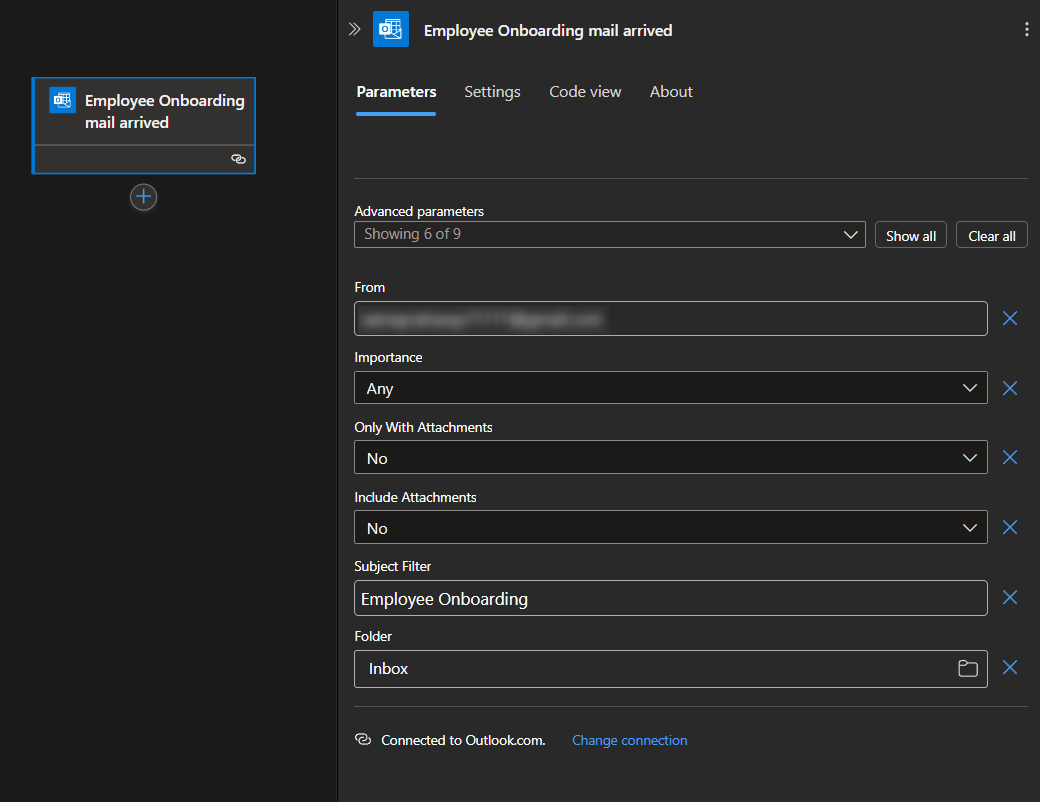
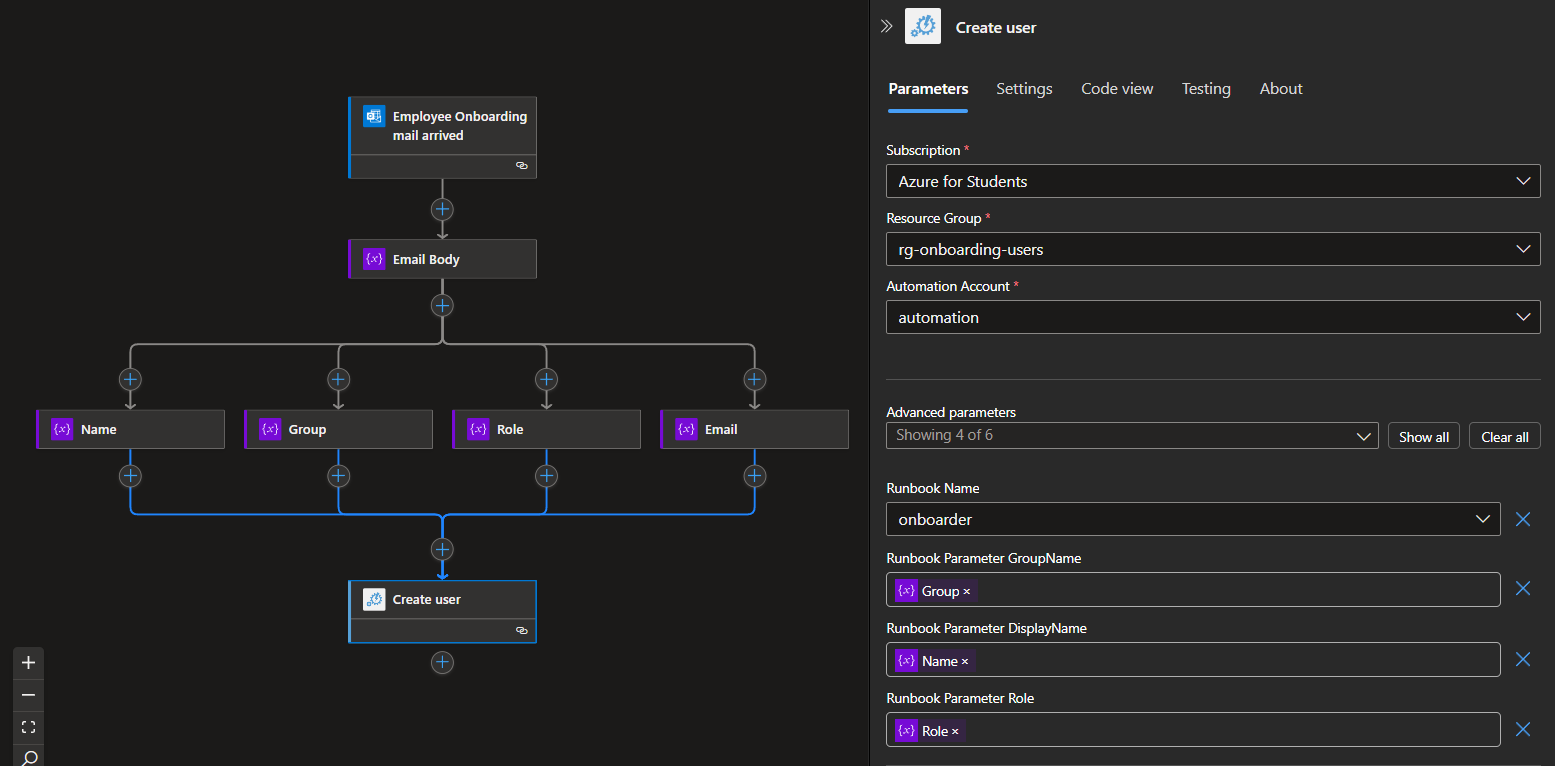
- The workflow will start from the Trigger when an email arrives in the mailbox:
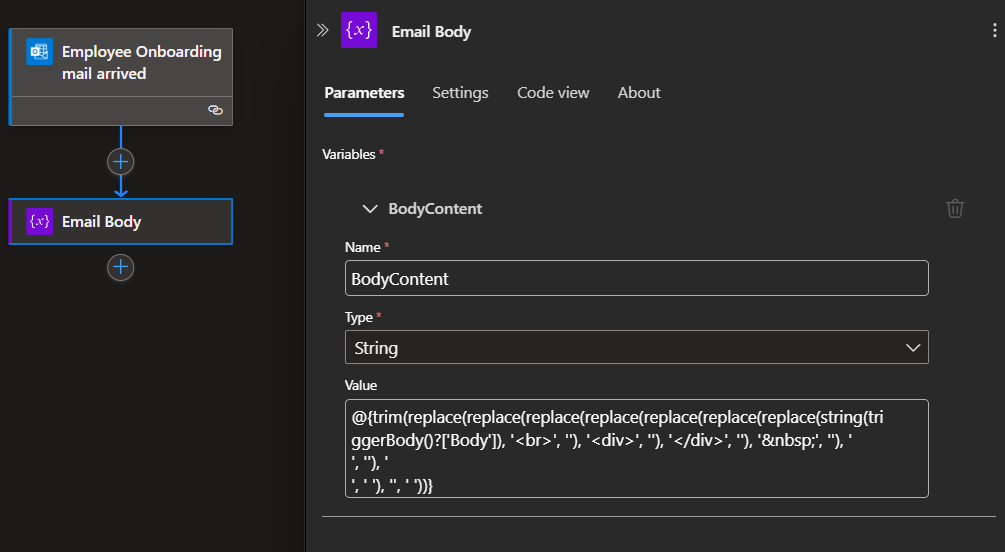
- Get the body of the mail in the desired format so that we can work on it. For that, we will perform some string operations and store them in a variable:
trim(replace(replace(replace(replace(replace(replace(replace(string(triggerBody()?['Body']), '<br>', ''), '<div>', ''), '</div>', ''), ' ', ''), '
', ''), '
', ' '), '
', ' '))
Get Employee Details like Name, Group, Role, etc. from the above variable.
- Name:
trim(split(split(variables('BodyContent'), 'Name: ')[1], 'Group:')[0]) - Group:
trim(split(split(variables('BodyContent'), 'Group: ')[1], 'Role:')[0]) - Role:
trim(split(split(variables('BodyContent'), 'Role: ')[1], 'Date:')[0]) - Email:
trim(split(split(split(split(variables('BodyContent'), 'Email: ')[1], 'Date:')[0], '>')[1], '<')[0]) - Password: You can make it in a runbook and use it like I did.
- Name:
Making a new job for an automation account runbook, and passing a variable to the PowerShell script:
Note: For outputs to be fetched in next action, check the 'Wait for Job' option otherwise it won't read the outputs form the runbook.
Now, to get Job output, choose the action and pass the dynamic value of JobId from previous action:
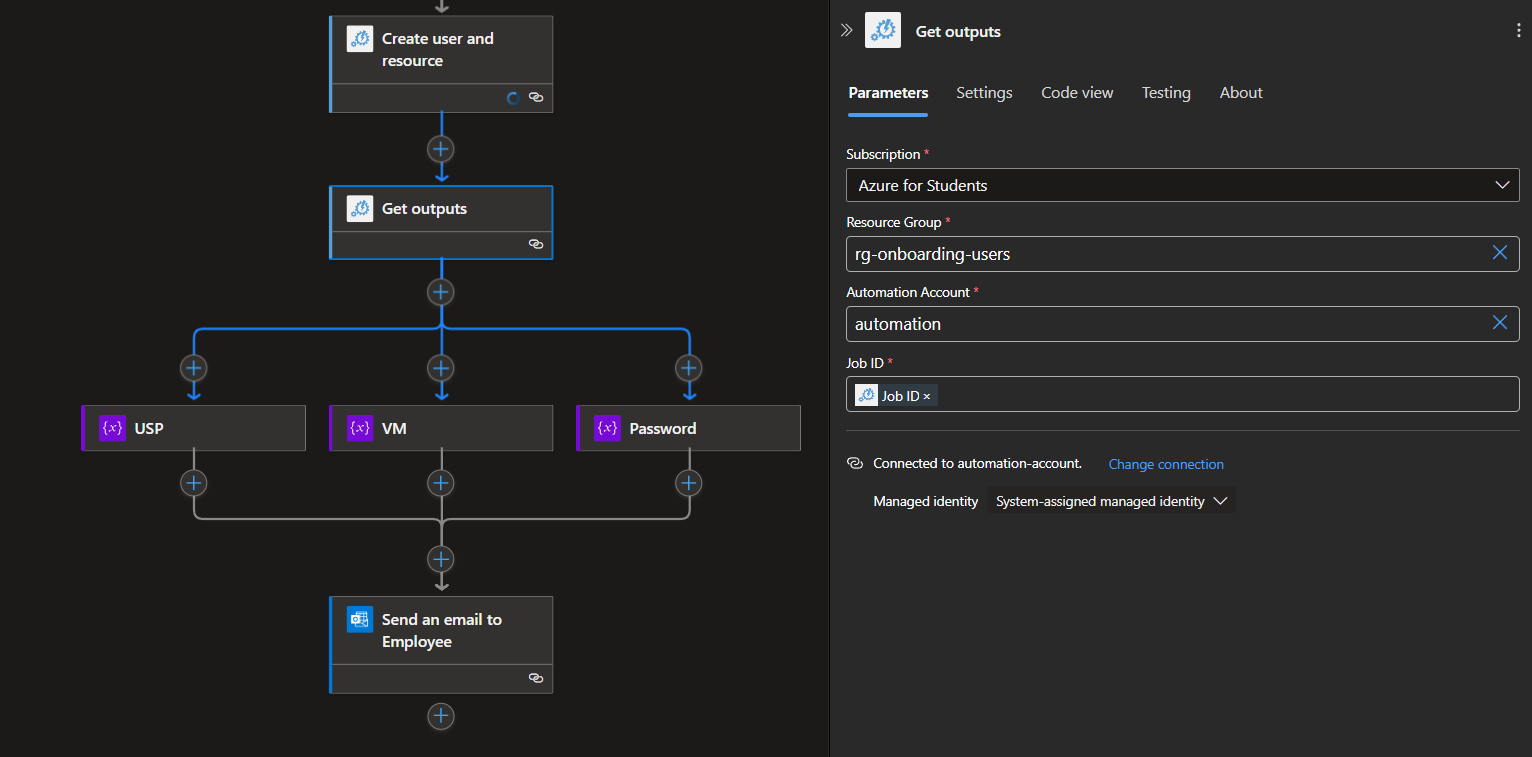
In the runbook, we defined a structure in JSON for output, to parse that correctly, initialize following variables:
- USP:
trim(split(split(body('Get_outputs'), '"UserName": "')[1], '"')[0]) - VM:
trim(split(split(body('Get_outputs'), '"VM": "')[1], '"')[0]) - Password:
trim(split(split(body('Get_outputs'), '"Password": "')[1], '"')[0])
- USP:
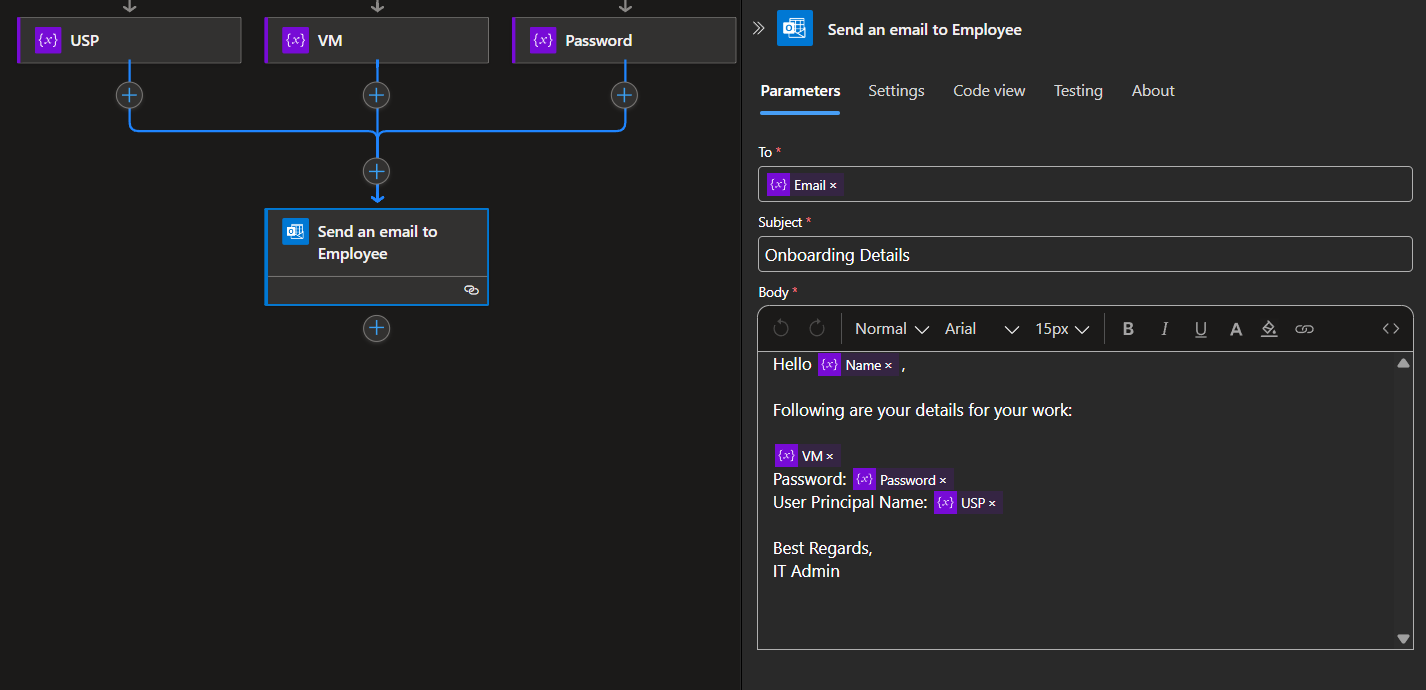
Pass these variables to the final action of Outlook Email:
1.3 Storage Account
- To make resources for new employees, we need an ARM Template.
- Make an json file with following code and put that file inside in a storage account container.
{
      "$schema": "https://schema.management.azure.com/schemas/2019-04-01/deploymentTemplate.json#",
      "contentVersion": "1.0.0.0",
      "parameters": {
        "adminUsername": {
          "type": "string"
        },
        "location": {
          "type": "string"
        },
        "adminPassword": {
          "type": "string"
        },
        "vmName": {
          "type": "string"
        }
      },
      "variables": {
        "vNetName": "[concat(parameters('vmName'), '-vnet')]",
        "vNetAddressPrefixes": "10.0.0.0/16",
        "vNetSubnetName": "default",
        "vNetSubnetAddressPrefix": "10.0.0.0/24",
        "vmName": "[parameters('vmName')]",
        "publicIPAddressName": "[concat(parameters('vmName'), '-ip')]",
        "networkInterfaceName": "[concat(parameters('vmName'), '-nic')]",
        "networkSecurityGroupName": "[concat(parameters('vmName'), '-nsg')]"
      },
      "resources": [
        {
          "type": "Microsoft.Network/networkSecurityGroups",
          "apiVersion": "2020-05-01",
          "name": "[variables('networkSecurityGroupName')]",
          "location": "[parameters('location')]",
          "properties": {
            "securityRules": [
              {
                "name": "allow_ssh_rule",
                "properties": {
                  "description": "Locks inbound down to ssh default port 22.",
                  "protocol": "Tcp",
                  "sourcePortRange": "*",
                  "destinationPortRange": "22",
                  "sourceAddressPrefix": "*",
                  "destinationAddressPrefix": "*",
                  "access": "Allow",
                  "priority": 123,
                  "direction": "Inbound"
                }
              }
            ]
          }
        },
        {
          "type": "Microsoft.Network/publicIPAddresses",
          "apiVersion": "2020-05-01",
          "name": "[variables('publicIPAddressName')]",
          "location": "[parameters('location')]",
          "properties": {
            "publicIPAllocationMethod": "Dynamic"
          },
          "sku": {
            "name": "Basic"
          }
        },
        {
          "type": "Microsoft.Network/virtualNetworks",
          "apiVersion": "2020-05-01",
          "name": "[variables('vNetName')]",
          "location": "[parameters('location')]",
          "dependsOn": [],
          "properties": {
            "addressSpace": {
              "addressPrefixes": [
                "[variables('vNetAddressPrefixes')]"
              ]
            },
            "subnets": [
              {
                "name": "[variables('vNetSubnetName')]",
                "properties": {
                  "addressPrefix": "[variables('vNetSubnetAddressPrefix')]"
                }
              }
            ]
          }
        },
        {
          "type": "Microsoft.Network/networkInterfaces",
          "apiVersion": "2020-05-01",
          "name": "[variables('networkInterfaceName')]",
          "location": "[parameters('location')]",
          "dependsOn": [
            "[resourceId('Microsoft.Network/publicIPAddresses', variables('publicIPAddressName'))]",
            "[resourceId('Microsoft.Network/virtualNetworks', variables('vNetName'))]",
            "[resourceId('Microsoft.Network/networkSecurityGroups', variables('networkSecurityGroupName'))]"
          ],
          "properties": {
            "ipConfigurations": [
              {
                "name": "ipconfig1",
                "properties": {
                  "privateIPAllocationMethod": "Dynamic",
                  "publicIPAddress": {
                    "id": "[resourceId('Microsoft.Network/publicIPAddresses', variables('publicIPAddressName'))]"
                  },
                  "subnet": {
                    "id": "resourceId('Microsoft.Network/virtualNetworks/subnets', variables('vNetName'), variables('vNeSubnetName'))]"
                  }
                }
              }
            ],
            "networkSecurityGroup": {
                "id": "[resourceId('Microsoft.Network/networkSecurityGroups', variables('networkSecurityGroupName'))]"
            }
          }
        },
        {
          "type": "Microsoft.Compute/virtualMachines",
          "apiVersion": "2021-11-01",
          "name": "[variables('vmName')]",
          "location": "[parameters('location')]",
          "dependsOn": [
            "[resourceId('Microsoft.Network/networkInterfaces', variables('networkInterfaceName'))]"
          ],
          "properties": {
            "hardwareProfile": {
              "vmSize": "Standard_B1s"
            },
            "osProfile": {
              "computerName": "[variables('vmName')]",
              "adminUsername": "[parameters('adminUsername')]",
              "adminPassword": "[parameters('adminPassword')]"
            },
            "storageProfile": {
              "imageReference": {
                "publisher": "Canonical",
                "offer": "0001-com-ubuntu-server-jammy",
                "sku": "22_04-lts-gen2",
                "version": "latest"
              },
              "osDisk": {
                "createOption": "fromImage"
              }
            },
            "networkProfile": {
              "networkInterfaces": [
                {
                  "id": "[resourceId('Microsoft.Network/networkInterfaces', variables('networkInterfaceName'))]"
                }
              ]
            }
          }
        }
      ]
      }
1.4 Automation Account
- Create an Automation account in the same resource group as the logic app; we will use this in the logic app connector to run the runbook.
- Create a runbook inside automation account with the following powershell code:
param(
          [string] $displayName,
          [string] $groupName,
          [string] $role
      )

      function Generate-Password {
          param(
              [int]$Length = 12,
              [string]$CharacterSet = "abcdefghijklmnopqrstuvwxyzABCDEFGHIJKLMNOPQRSTUVWXYZ0123456789!@#%"
          )
          $Password = ""
          for ($i = 0; $i -lt $Length; $i++) {
              $Password += $CharacterSet[(Get-Random -Maximum $CharacterSet.Length)]
          }
          return $Password
      }

      $password = Generate-Password -Length 10
      $securePassword = ConvertTo-SecureString -String $password -AsPlainText -Force
      $usp = (($displayName -split ' ') -join '') + "@YOUR-DOMAIN"

      Write-Output "Creating User: $($displayName) in group: $($groupName) with role: $($role)."

      # User Creation
      Connect-AzAccount -Identity
      $user = New-AzADUser -DisplayName $displayName -UserPrincipalName $usp -Password $securePassword -MailNickname (($displayName -split ' ') -join '')
      $group = Get-AzADGroup -DisplayName $groupName
      Add-AzADGroupMember -TargetGroupObjectId $group.Id -MemberObjectId $user.Id

      # Resource Provisioning
      $uri = "YOUR-BLOB-SAS-URL"
      $vmName = "vm-" + (($displayName -split ' ') -join '')
      $templateParams = @{
          vmName        = $vmName
          location      = "centralindia"
          adminUsername = (($displayName -split ' ') -join '')
          adminPassword = $password
      }

      New-AzResourceGroupDeployment -Name "EmployeeVMProvising" -ResourceGroupName "users" -TemplateUri $uri -TemplateParameterObject $templateParams
      New-AzRoleAssignment -ObjectId $user.Id -RoleDefinitionName "Virtual Machine Contributor" -Scope "/subscriptions/76b9c2ae-23b7-4d4e-aec7-52a7e0b85f8c/resourceGroups/users/providers/Microsoft.Compute/virtualMachines/$vmName"

      # Outputs to Logic App
      $output = @{
          UserName = $usp
          Password = $password
          VM = "You are assigned to VM located at: /subscriptions/SUBSCRIPTION-ID/resourceGroups/users/providers/Microsoft.Compute/virtualMachines/$vmName"
      }
      $output | ConvertTo-Json
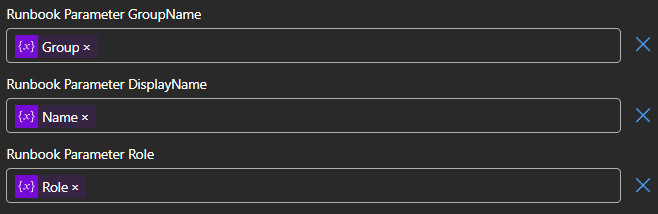
- This runbook accepts the following parameters, which are passed from Logic App:
1.5 Notes
- Make sure your managed identity associated with the Logic App has enough permissions on some scope to access the automation account.
- Make sure your managed identity associated with the Automation Account have enough permissions on 'users' resource group for creating resource deployments, for creating users and managing them.
1.6 Demonstration
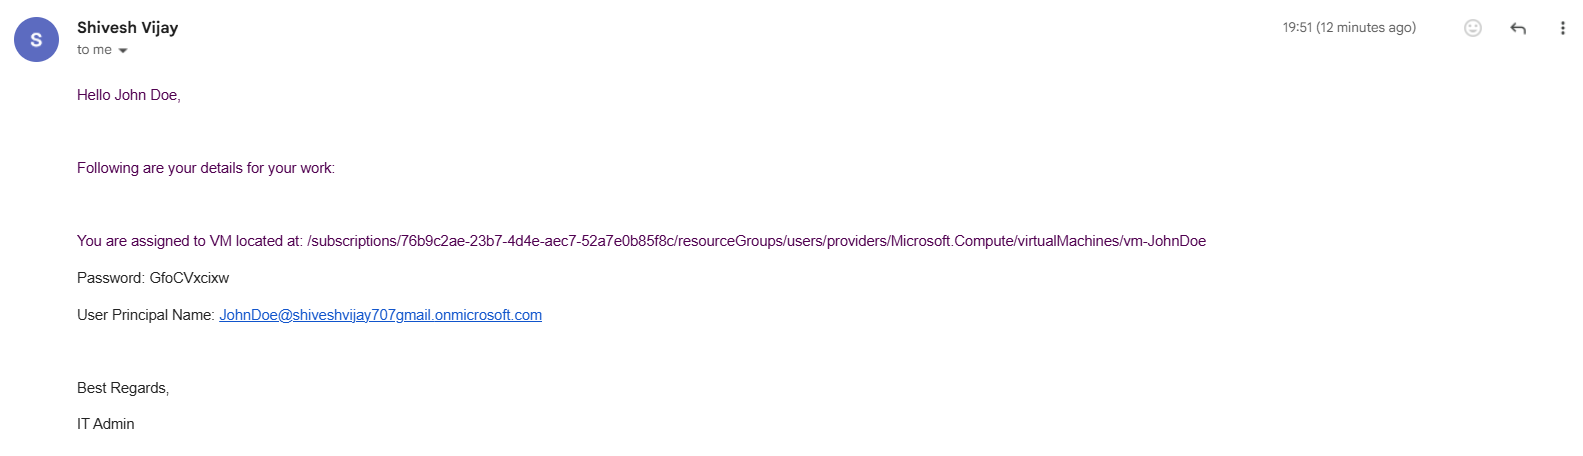
- The mail that triggers the workflow will have a body that follows the structure below:
Hello XYZ, There is a new Employee joining our organization ABC. Please onboard the following new employee: Name: John Doe Group: IT Role: IT Admin Email: johdoe@gmail.com Date: 24 April 2025 Best Regards, HR - The workflow will start running and at end will send details to the employee's email like below: